In R2014 a new feature appeared, it is called Displace Elements. I could not find any documentation, for multiple use ot ths command. You can displace displaced elements again:

10/17/2013
9/11/2013
Leave opening after demolishing a door
I read many about this realworld-to-bim problem. In revit after demolishing an opening (door or window) a wall appears with the same structure as the Host. I found a workaround, you can watch it HERE.
Simply add a Filter to your Views. You can do it with a View Template... in Scheduled you can add a Filter for the Comment parameter value.
Simply add a Filter to your Views. You can do it with a View Template... in Scheduled you can add a Filter for the Comment parameter value.
9/05/2013
How to use a Pointcloud?
Pointclouds are getting known by the AEC industry more-and-more. You can find a little fantasy catalisator movie. Nowdays you do not need extra strong workstation, to handle billions of points.
If you have experiences, I would be happy if you could share with me, or we can talk about mines.
8/21/2013
Double-click
Most of my ex-AutoCAD user patners needed the option, to edit Families and Links easily, as they did before with a double-click on the spoted element. As I see other all around the World had the same issue, and the function is built into Revit. You can customize t under the Application menu (R button in he top-left corner) / Options:
 The key setting window is here:
 You can select an action to each double-clickable entity. This can be Do Nothing, Edit Type, or Edit Element, whitch means edit sketch at some cases including Floors and Stairs.


8/14/2013
Memento
Actually not Revit, but I saw a really interesting tech preview. Laserscaning is one f my point of interest for a while, and as I can see not only mine, but the Autodesk guys' too.
I really like this. If you have a retrofit or renovation projects, and want to use the newest technologies, do not hesitate, to invite me. :)
With the current commercial and free tools you can do really exciting things with old style elevations or MEP rooms modelling based on pointclouds. This new tool can help you, de purge unvanted dtas or imperfections. And the most important it creates usable geometry from the points.
I really like this. If you have a retrofit or renovation projects, and want to use the newest technologies, do not hesitate, to invite me. :)
7/16/2013
Self-sizing Beam
I was wondering several times about Self-Sizing components, to avoid stability problems in the Conceptual Design Phase. In Revit it is absolutelly possible. With adding many-many parameters, you can apply Code-Based sizing methods, but in my current example I just added an easy geometrical rule to my Beam.
To simlify this task, I edit the built-in Extrusion in the Template:
 For this, please step into an Elevation View in the appearing list:
The keypoint is the Formula of param h above.
 |
| First of all we need a good Template |

 |
| b for Width as a Type parameter and h for Heigth as an Instance parameter |
 |
| Just load your Beam to the project and enjoy! |
7/08/2013
Object Styles
During my presentations I frequently meet dismay on architect's faces, when I tell them Revit do NOT contains Layers. The reason is that we do not need them at all, and this is a fact.
Objects (Components) know their kind (Category) and the appeas as they should in all Views.
 Not only the Components, but all of their 2D and 3D sub-elements, lines and forms (Sub-Categories) have clear look. To every Category you can add sub-categories, if necessary.
In the row of the table above you can set the exact face of every Category in Cut and Projecion. The Material defines the cut-fill of the 3D components in plan and section views.
These setting are valid in the whole project and can be saved to templates. This global setting can be overwritten by Views in the Visibility/Graphics dialog.
Objects (Components) know their kind (Category) and the appeas as they should in all Views.

In the row of the table above you can set the exact face of every Category in Cut and Projecion. The Material defines the cut-fill of the 3D components in plan and section views.
These setting are valid in the whole project and can be saved to templates. This global setting can be overwritten by Views in the Visibility/Graphics dialog.
7/01/2013
Curtain Wall by temper #5
When you have a "clear vision of the dividing lines, or want to design a climbing wall" case.

Let's start form Lesson #4. You can divide the Faces of a Mass by Planes. These could be Levels and/or Grids, if you want to make it easily constructable, or Reference Planes with no limitation of directions. Just select the Intersects command on the Ribbon, and follow the guidance on the Status Bar at the bottom of the screen.
 |
| You can see the division in different view options. Surface / Pattern / Component |
 |
| Sorry János, the image is from Google... |
We tried to plot it in 3D, but this is another story:
 |
| 11.11.2011 @ Varinex Inc. |
If you have any further question about Curtain Walls, do not hesitate, ask. That could be the 6th chapter ;)
6/22/2013
Curtain Wall by temper #4
I had to think about this solution, when we had to follow the visions of a bunch of designers hour-by-hour. This was critical, because I was sitting on the Structural Engineers side and we had to create Formwork and Rebar Drawings with a tight deadline.

The post before this gets sense here! On a Division Pattern you can use Pattern Based Curtain Panels, not only layout ideas. The offspring is a distorted construction divided to flat triangular faces!
The main idea is, to Create a Mass, whitch could be a real mass, or just Surfaces. All faces of the Mass can be divided to smaller ones. In Conceptual state you can add Curtains System easily to them.
Or you can use a Pattern for the division, whitch works exactly the same as we saw at Curtain Walls.
 |  | |
| Patterns | Properties |
6/14/2013
Triangulate a Distorted Face
Before going on with the Curtain Wall story, we have to stop for additional informations. The following technic will be useful for Adaptive Components too.
As nearly everything in Revit, this is a Workplain related story. All Point's and Line's Offset value works perpendicular to it's Host. The solution is easy againt, just try to think like Revit does ;)
When the Adaptive Components were implemented, they gave me many nigths of Googleing in hell of hell to recognize the possibilities. I would like to save your time by showing how to work with them.
As nearly everything in Revit, this is a Workplain related story. All Point's and Line's Offset value works perpendicular to it's Host. The solution is easy againt, just try to think like Revit does ;)
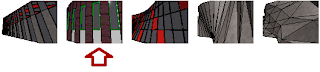
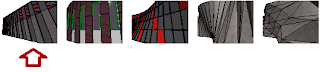
 |
| Find the difference |
- We should not spend too much time on the one on the lefthand side. [On the image you can see "Használhatatlan" marked, it means Useless in Hungarian.] I just opened a template (Metric Curtain Panel Pattern Based.rft), and changed the Pattern to Triangle (flat) on the Properties Palette, after that just made a Form from the original Reference Lines.
By this method the triangle based prisms open on convex faces and intersecting on concaves... - On the righthand side you can find a trick, to create a countinuous external face for the (Curtain) Wall. We just have to define the offseted corners.
- Open the template named above
- use Reference Point Tool (as marked on image with 1-2.)
- Set the Workplace on horizontal planes of the original point before placing a new (as marked 3-5.)

- Repeat this to the rest two corners
- Select the three new Point (you are going to pick the last placed ones by clicking on them)
- Add an Offset on the Properties Palette (maybe you can assign a parameter if you want to)
- Draw Reference Lines with 3D Snap (you can find this on the Options Bar)
- Create a Form from the upper and the original Reference Line chain
For Revit gourmands a small comment:
The Offset is true perpendicular to the corners, and it is NOT the real thickness of the truncated pyramid shaped panel. There are solutions to corrigate this, I may show some of them in later posts.
6/06/2013
Curtain Wall by temper #3
Just one step forward, from the Wall based Curtain systems, when it is bent in more than one direction. The secret is to Create an In-Place Mass and use it's Face for CW creation. I do not prefer this method, although it is easy to visualize concept, but it is tricky, to roll it to Construction documentation and Fabrication.
 So the step without detailed explanation:
- Create az In-Place Mass: Massing & Site Ribbon / Conceptual Mass Tab / In-Place Mass - maybe I will write about it later
- Place a Curtain System on it: Massing & Site Ribbon / Model by Face Tab / Curtain System (on the Ribbon do not forget to click Create System button after Face selection)
- You can add or remove Grids as we saw before
- Changing Panels was a previous topic also
- You can add Mullions at the Type Properties of the Curtain Wall or one-by-one with the Mullion command from the Home/Architecture Ribbon
Do not wait for a miracle. You can offset the Grid from adjusted line, but can not rotate from main direction of the Mass face jused as source geometry. You can do tricks, with creating Masses using custom Reference Planes or Faces, but this could be too difficult for a Revit-newbe...
6/01/2013
Curtain Wall by temper #2
Freeform in Plan View, but still made of Wall case
The current trick is that you can divide Grid Lines of the Curtain Wall by segments. So you can free up your Segments form the original Grid system. For this, jut pick the Gridline (NOT the Mullion, but the dashed line), for this you may nedd to hit Tab button sometimes.
TIP: If you have many Gridline to modify, just hide Curtain Wall Mullions in the Visibility/Graphics window, or by right-clicking on them and select Hide in View > By Category option from the popup menu.
TIP: If you have many Gridline to modify, just hide Curtain Wall Mullions in the Visibility/Graphics window, or by right-clicking on them and select Hide in View > By Category option from the popup menu.
 |
| If you succeded with the selection, you have to see this as the last element on the Ribbon menu |
 |
| For adding new Gridline, use the Curtain Grid command from the Architecture/Home tab of Ribbon, and please see adding options |
After creating your Grid system, just replace Panels, like we did in the previous post at point 4-5.
 |
| I often use this technic, in case of rhythmically changing wall thichnesses |
In case of using differend Wall Types, use their Offset instance parameter, to justify them.
Instead of Panels and Wall Types, you can also use Openings, just load them from any Revit Library and select from the Properties Palette.
5/27/2013
Curtain Wall by temper #1
In the past years I met many Curtain Wall related question, and going to answer you. This micro series is addressed to advanced users. If you have questions, do not hesitate to ask.
The easiest is, to use a Wall
Place a Wall in a plan or 3D View with any Curtain Wall type. (Choose on the top of Properties Palette)
- Check Type Properties by hitting Edit Type button on the Properties Palette. Here you can specify Vertical and Horizontal layout rule, distance.
- Justification and rotation Angle can be set at instance properties, or by clicking
 the mark after selection.
- After this, it is unpretentious to turn your Curtain Wall colorful. Select the panels one-by-one in groups and change them to another Curtain Panel or WALL type. (Maybe you should use the TAB key, to select the wanted one.)
- If you are brave enought, select Curtain Wall types to the panels and change their Angles different from the bigone. (Step 2-4)
- For superheroes I suggest to repeat Step 5 aswell ;)

In the properties palette you can select where to schedule these special walls with the "Categorize as" parameter.
5/21/2013
Place a Wall
Actually this is the most common step to start drafting. It is recommended to care about 3D, not only the plan layout. Check options one-by-one on the Options Bar after selecting the Wall tool from the Ribbon or type the "WA" keyboard shortcut.
 |
| User Interface during Wall command |
- Choose a placing method from the green backgrounded Ribbon section
- Select the Wall Type you would like to build
- Select the direction from the actual level (Height, Depth means up and down)
- Select a Level or type in a real height or dept (depends on the third paragaph)
- Location Line shows the theoretic line of the Wall structure, it can be: Wall Centerline, Core Centerline, Finish Face: Exterior, Finish Face Interior, Core Face: Exterior, Core Face: Interior (for effective modeling I suggest you, to use Core faces and centerline if possible)
5/14/2013
Online Trial
I have seen this before in Beta, but I could not imageine that Autodesk is coming out with online trial this year.
Before you strat to scream, I have to tell you, most of the software developers going this way, in their own speed :)
If you like the unclouded way, you can buy an expensive machine to use...
Try it »
 |
| It is not available in every region, yet... |
If you like the unclouded way, you can buy an expensive machine to use...
Try it »
5/13/2013
Welcome
Warm welcome to all interested. After eight years of learning BIM, and great successes in Hungarian adoption, I decided to blog in English aswell.
Based on my actual projects and experiences, I am going to guide you to the world of BIM.
I hope my effort is goint to be an opportunity for you.

You can ask me about Revit, Navisworks and so many realted AEC design solutions.
Based on my actual projects and experiences, I am going to guide you to the world of BIM.
I hope my effort is goint to be an opportunity for you.
You can ask me about Revit, Navisworks and so many realted AEC design solutions.
Subscribe to:
Posts (Atom)