Pages

Showing posts with label Grid. Show all posts

7/01/2013

Curtain Wall by temper #5

When you have a "clear vision of the dividing lines, or want to design a climbing wall" case. 
Let's start form Lesson #4. You can divide the Faces of a Mass by Planes. These could be Levels and/or Grids, if you want to make it easily constructable, or Reference Planes with no limitation of directions. Just select the Intersects command on the Ribbon, and follow the guidance on the Status Bar at the bottom of the screen. 

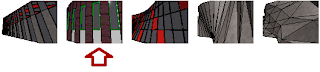
You can see the division in different view options. Surface / Pattern / Component
I have seen this problem before, that time we solved the problem, with a non-Revit way. That time, we had to Import a divided face to Revit. Unfortunatelly from the final design it was obliterated...
Sorry János, the image is from Google...
We tried to plot it in 3D, but this is another story: 
11.11.2011 @ Varinex Inc. 
 If you have any further question about Curtain Walls, do not hesitate, ask. That could be the 6th chapter ;)

6/22/2013

Curtain Wall by temper #4

I had to think about this solution, when we had to follow the visions of a bunch of designers hour-by-hour. This was critical, because I was sitting on the Structural Engineers side and we had to create Formwork and Rebar Drawings with a tight deadline. 
The main idea is, to Create a Mass, whitch could be a real mass, or just Surfaces. All faces of the Mass can be divided to smaller ones. In Conceptual state you can add Curtains System easily to them
Or you can use a Pattern for the division, whitch works exactly the same as we saw at Curtain Walls
PatternsProperties
The post before this gets sense here! On a Division Pattern you can use Pattern Based Curtain Panels, not only layout ideas. The offspring is a distorted construction divided to flat triangular faces!

6/06/2013

Curtain Wall by temper #3

Just one step forward, from the Wall based Curtain systems, when it is bent in more than one direction. The secret is to Create an In-Place Mass and use it's Face for CW creation. I do not prefer this method, although it is easy to visualize concept, but it is tricky, to roll it to Construction documentation and Fabrication.
So the step without detailed explanation:

  1. Create az In-Place Mass: Massing & Site Ribbon / Conceptual Mass Tab / In-Place Mass - maybe I will write about it later
  2. Place a Curtain System on it: Massing & Site Ribbon / Model by Face Tab / Curtain System (on the Ribbon do not forget to click Create System button after Face selection)
  3. You can add or remove Grids as we saw before
  4. Changing Panels was a previous topic also
  5. You can add Mullions at the Type Properties of the Curtain Wall or one-by-one with the Mullion command from the Home/Architecture Ribbon
Do not wait for a miracle. You can offset the Grid from adjusted line, but can not rotate from main direction of the Mass face jused as source geometry. You can do tricks, with creating Masses using custom Reference Planes or Faces, but this could be too difficult for a Revit-newbe...

6/01/2013

Curtain Wall by temper #2

Freeform in Plan View, but still made of Wall case

The current trick is that you can divide Grid Lines of the Curtain Wall by segments. So you can free up your Segments form the original Grid system. For this, jut pick the Gridline (NOT the Mullion, but the dashed line), for this you may nedd to hit Tab button sometimes.
TIP: If you have many Gridline to modify, just hide Curtain Wall Mullions in the Visibility/Graphics window, or by right-clicking on them and select Hide in View > By Category option from the popup menu. 
If you succeded with the selection, you have to see this as the last element on the Ribbon menu
Now move your cursor over the Gridline and simly click. If you pick a segment dividing panel, it is going to disappear, if there were no division there it is going to disappear. 
For adding new Gridline, use the Curtain Grid command from the Architecture/Home tab of Ribbon, and please see adding options
After creating your Grid system, just replace Panels, like we did in the previous post at point 4-5.
I often use this technic, in case of rhythmically changing wall thichnesses

In case of using differend Wall Types, use their Offset instance parameter, to justify them. 
Instead of Panels and Wall Types, you can also use Openings, just load them from any Revit Library and select from the Properties Palette.