
Freeform in Plan View, but still made of Wall case
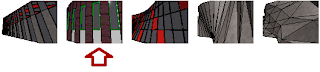
The current trick is that you can divide Grid Lines of the Curtain Wall by segments. So you can free up your Segments form the original Grid system. For this, jut pick the Gridline (NOT the Mullion, but the dashed line), for this you may nedd to hit Tab button sometimes.
TIP: If you have many Gridline to modify, just hide Curtain Wall Mullions in the Visibility/Graphics window, or by right-clicking on them and select Hide in View > By Category option from the popup menu.
TIP: If you have many Gridline to modify, just hide Curtain Wall Mullions in the Visibility/Graphics window, or by right-clicking on them and select Hide in View > By Category option from the popup menu.
 |
| If you succeded with the selection, you have to see this as the last element on the Ribbon menu |
 |
| For adding new Gridline, use the Curtain Grid command from the Architecture/Home tab of Ribbon, and please see adding options |
After creating your Grid system, just replace Panels, like we did in the previous post at point 4-5.
 |
| I often use this technic, in case of rhythmically changing wall thichnesses |
In case of using differend Wall Types, use their Offset instance parameter, to justify them.
Instead of Panels and Wall Types, you can also use Openings, just load them from any Revit Library and select from the Properties Palette.
No comments:
Post a Comment